Last updated on May 30, 2023
How to: List products on Google Shopping
Do you want to list your products on Google Shopping? In this article we give instructions on how to sell in Google Shopping. We go through the steps to add products to the Google Merchant Center and how you can set up your first Google Shopping campaign.
How does Google Shopping work?
Google Shopping is a place where you as a seller are able to show your products, their features and prices and update it on a regular basis. Consumers get to see the products in Google. When they search for a product it is displayed at the top of the page. This allows them to compare products and pricing straight from the search engine.
How do I list my products on Google Shopping?
You can submit a feed (which is a list of your product details) in the Google Merchant Center and connect it with your Google Ads. This will allow your product data to flow from your Merchant Center to Google Ads. Below, we describe how you can create a Merchant Center and Google Ads account.
What are Google Shopping campaigns?
As a seller, you are able to promote your online and local inventory and generate traffic to your website or local store. You are able to use the product details in different types of advertising campaigns, such as:
- Performance Max
- Shopping campaigns
These are the basic campaigns that you will need to start advertising. Now let’s go through the steps to get you up and running.
Sell in Google Shopping in 5 steps
- Sign up for Google Merchant Center
- Create a feed and add products to the Merchant Center
- Create a Google Ads account (if you don’t have one)
- Link your Merchant Center and Google Ads accounts
- Create a Google Shopping campaign (see the explanation below)
Create a Google Shopping campaign
Below are the instructions for creating your first Google Shopping campaign:
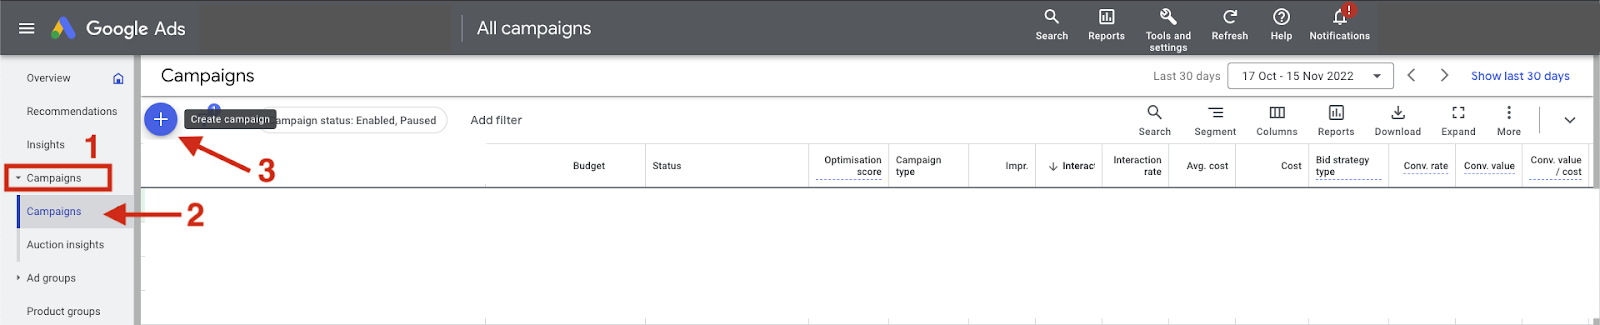
- Sign in to your Google Ads account
- Click Campaigns on the left sidebar
- Click the blue plus button and choose New campaign
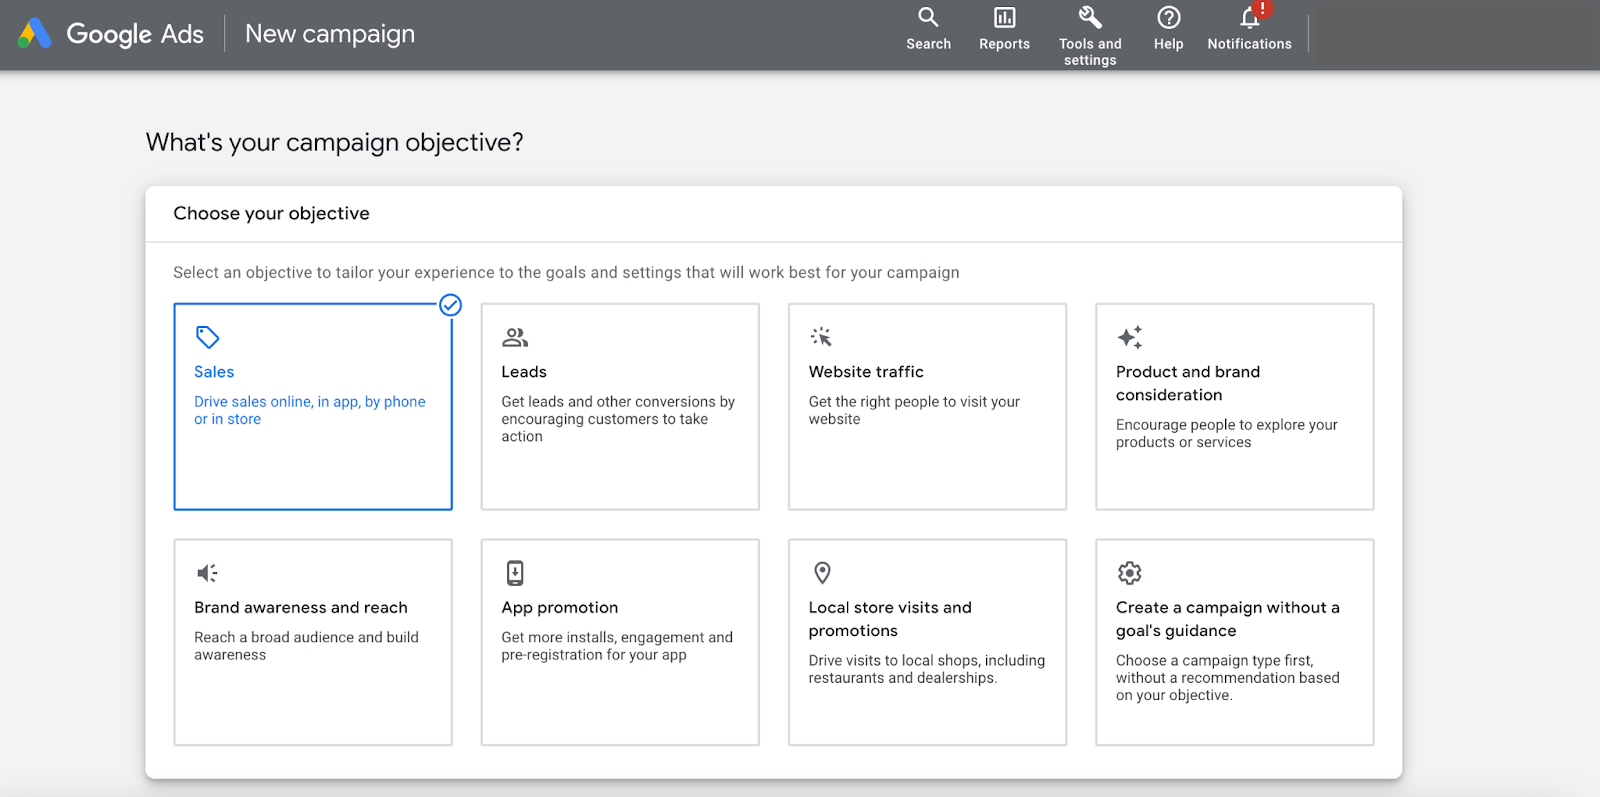
- Choose your objective
It can be sales, leads or brand awareness and reach- it depends on your goal.
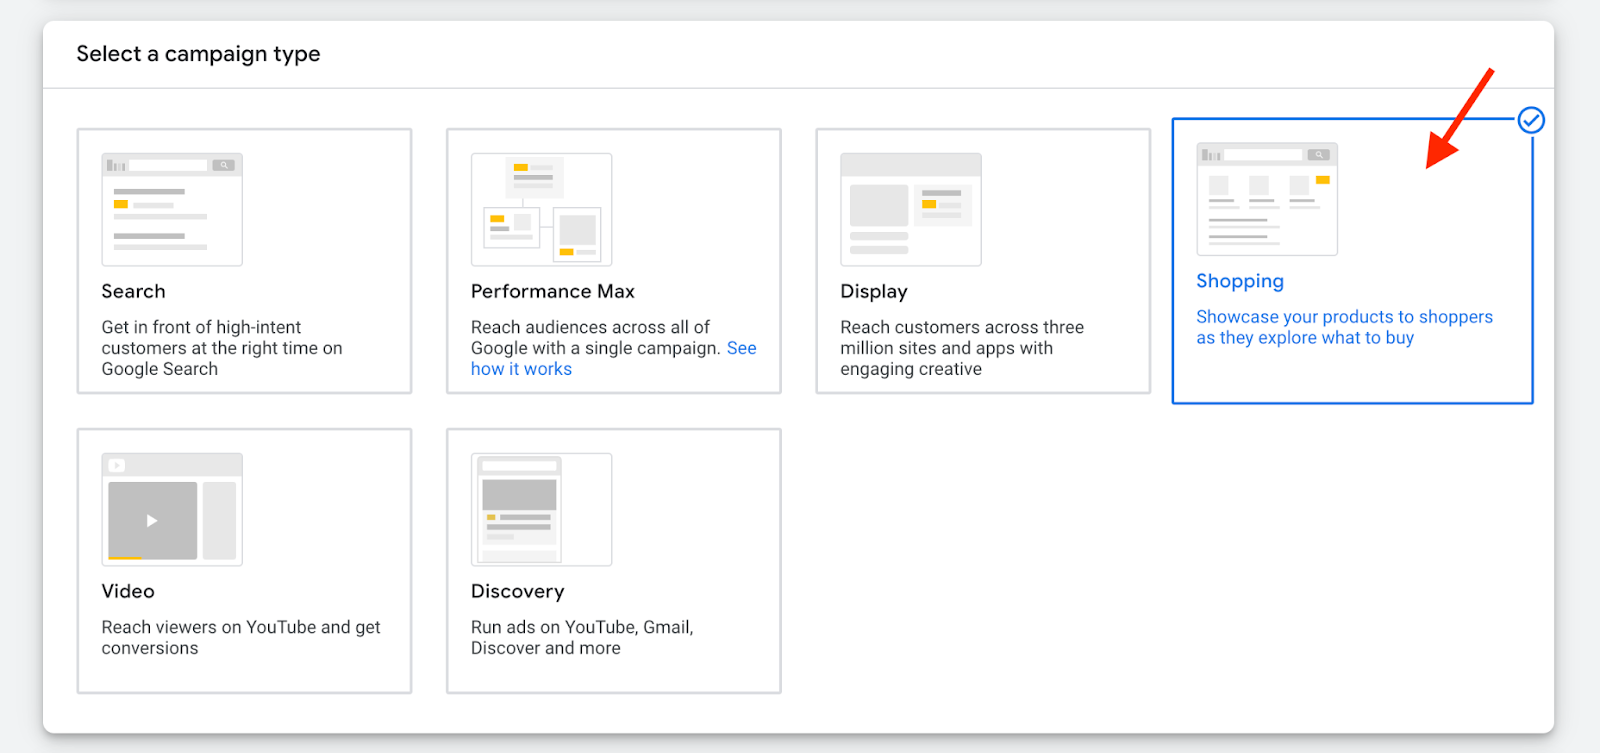
- Select Shopping as your campaign type.
Note: In this article, we show you how to set up your first Shopping campaign. If you are interested in Performance Max campaigns and which campaign types you can use, feel free to read this article to gain more information.
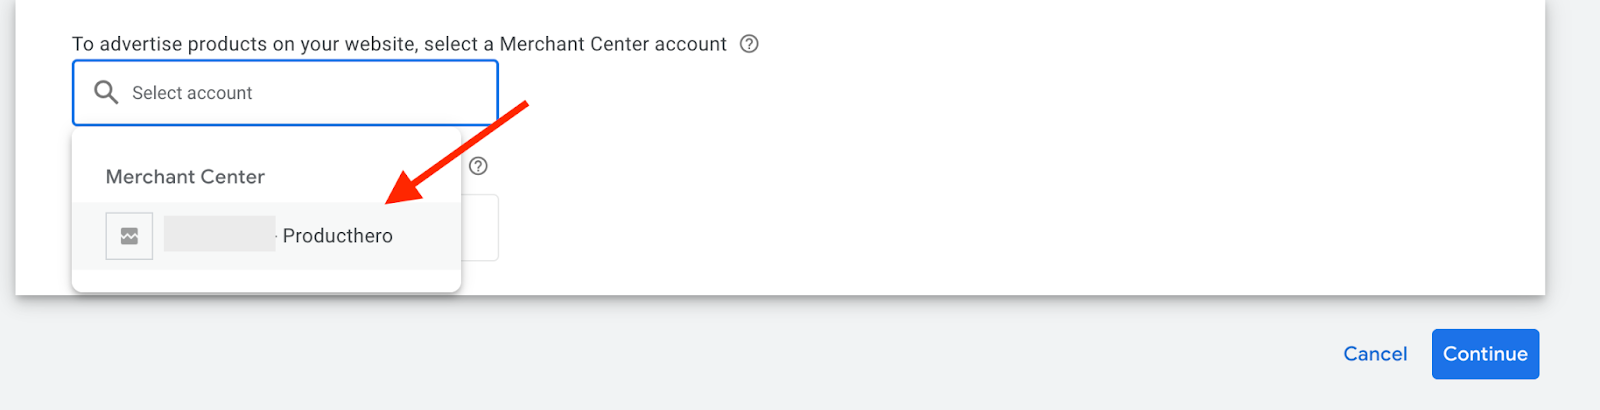
- Select the Merchant Center account within which you wish to advertise on Google Shopping and the country where the products are sold.
Note: If you don’t see any Merchant Centers in here, it means you need to link your Merchant Center and Google Ads account.
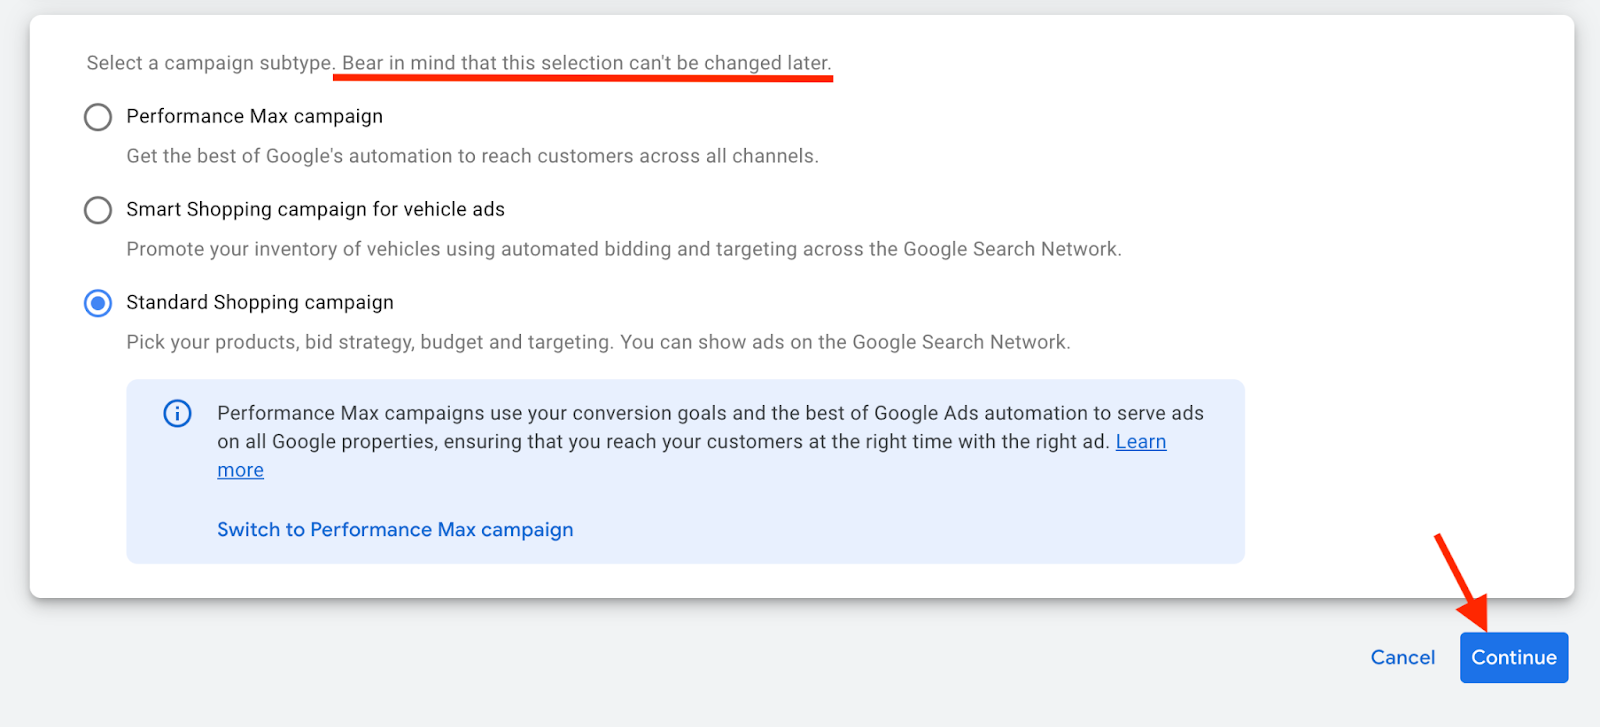
- Choose a campaign subtype. Keep in mind that this can’t be changed later. Click continue.
- Choose your advertising preferences:
- Campaign name: enter a name for your Shopping campaign.
You can change it after the campaign is created.
- Additional settings: use the drop-down menu to expand and edit settings as;
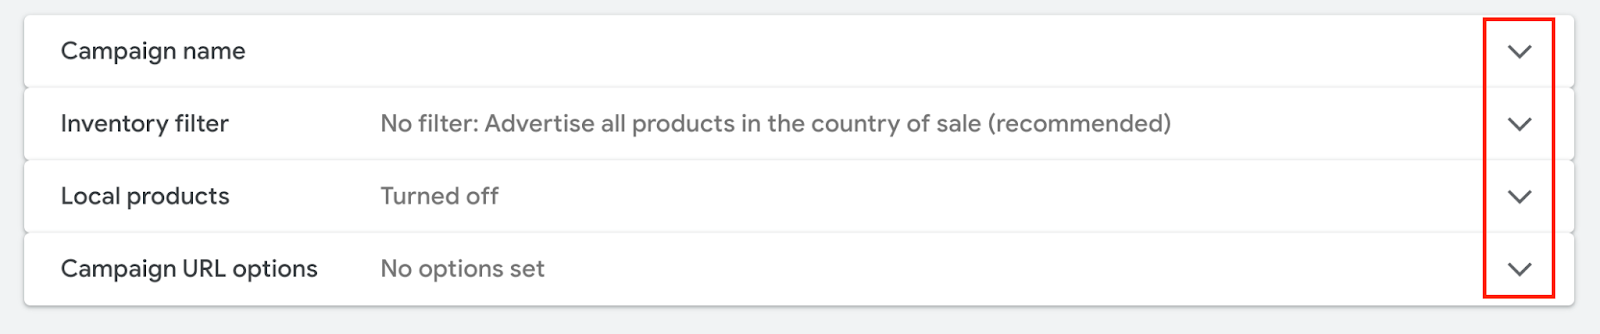
- Inventory filter: only choose this option if you want to limit the number of products used in your Shopping campaign. The inventory filter limits the products advertised in your campaign to the ones that match the requirements that you choose; such as category, brand or product type.
- Local products: enable this option if you wish to promote your products in your physical store. Make sure that local product data is available in your Merchant Center. Read more about Local inventory ads here
- Campaign URL options: select this option if you wish to track custom information in the URL. This option is useful if you want to analyse the data within a program other than Google Analytics (e.g., Adobe Analytics etc.). Read more about campaign URL option here
- Bidding: choose which type of bidding you’ll use in your campaigns. You can always change it later. This article helps you to determine the most suitable bid strategy.
- Campaign priority: only adjust it if you are advertising the same product in various campaigns in the same country or using the same feed label. This setting controls which campaign’s budget will be used when products overlap in the campaigns.
- Networks: This option is checked by default. This means that Shopping campaigns will be shown in different places (e.g. Google Search results). This can boost traffic to your website/products and increase conversions. You can also uncheck this option if you wish to exclude any other networks than Google Shopping.
- Devices: This option is chosen by default, and this means that ads will appear on any mobile devices or computers. You are able to change this setting after your campaign has been created.
- Locations: Within this setting, you limit (or not) where your ads will be shown to specific locations. You are able to change it after your campaign has been created.
- Local inventory ads: Choose this option only if you want your Shopping campaign to include products sold in local stores. Remember, that if you decide to select this option, you need to submit local product data in your Merchant Center. Read more about including local product inventory in your Shopping campaign here.
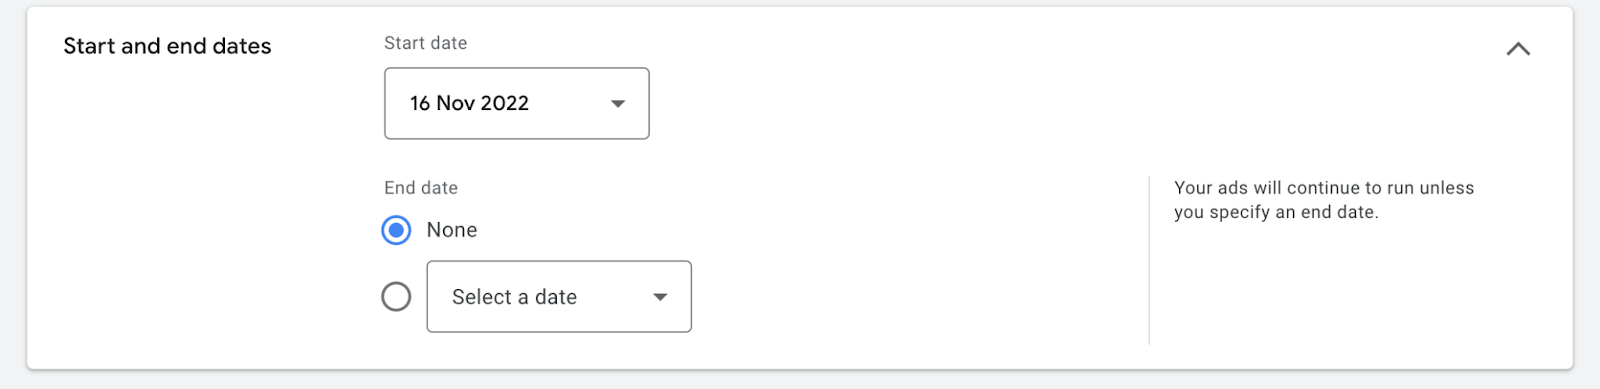
9. Set a start and end date.
10. Create your ad group.
This ad group will include product ads using information from the Merchant Center. This is something that happens automatically.
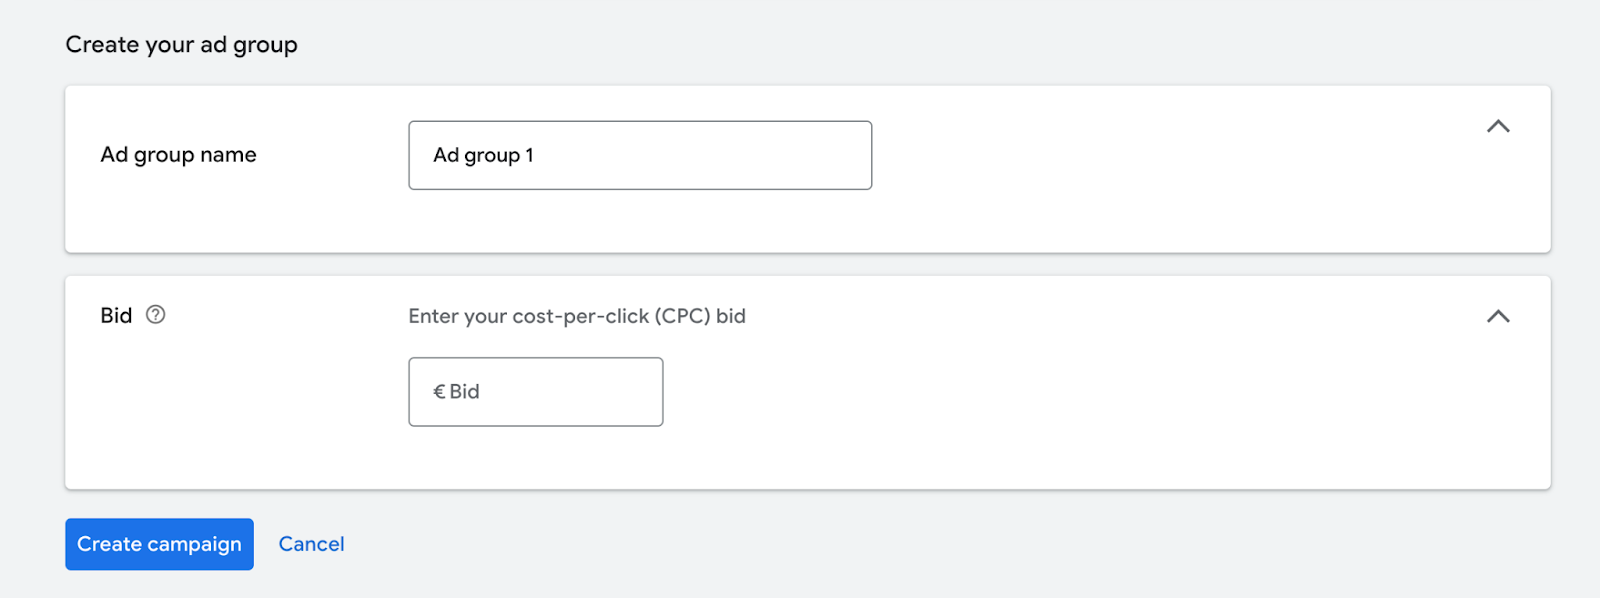
- Enter a name for your ad group name.
This name helps you to find the ad group. You can always change it after creating the campaign.
- Enter the CPC (cost-per-click) bid for your ad group.
11. Click Create campaign.
Your first Google Shopping campaign is now ready!
Now you are able to advertise your products in Google Shopping!
Before you start advertising with your shopping campaigns, we advise you to work with a Comparison Shopping Service Partner (CSS-partner). Due to European regulations, Google is forced to give a discount on the auction bid to CSS partners. That being said, working with a CSS partner will give you a 20% discount on your auction bid in Google Shopping.
Over 7,000 organizations chose Producthero as their CSS partner. With Producthero you also get tools to optimize your campaign, you maintain your own campaigns and receive premium support from us and you still have your Google support. Discover why small and big brands use Producthero, start a free 30 day trial.